Featured

Mosaic made to look like marble sheets?

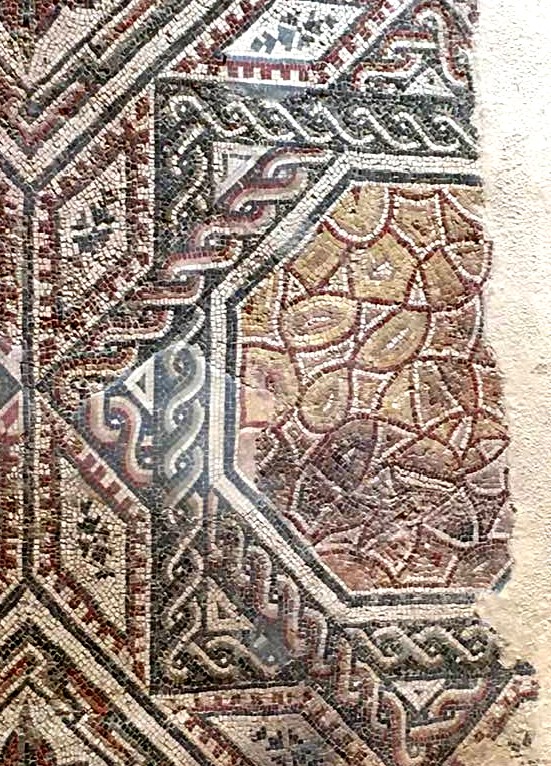
This is a mosaic from Piazza Amerina in Sicily and the part that is the most interesting is that on the right of this photo. I must admit it does remind me of what you can see under a microscope! Obviously it is not but what does it represent?

To me it looks like they are trying to represent a section of marble that has been sliced to show the different veins and colours. (Photo Helen Bodycomb)

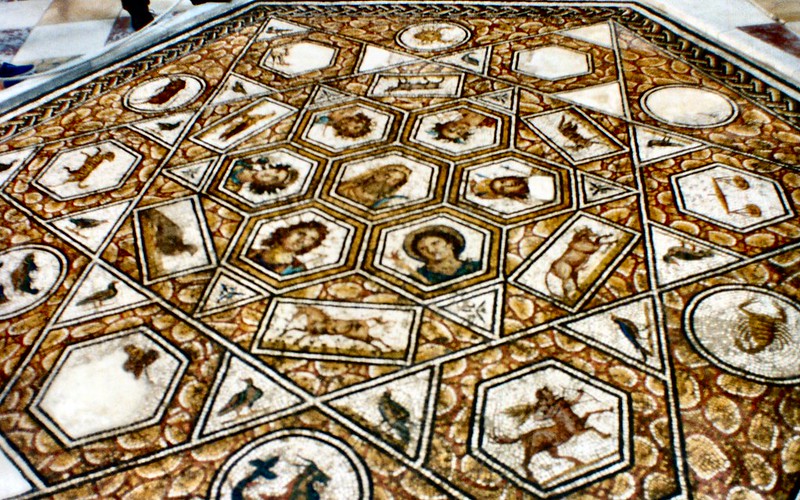
Now look at this example from the Bardo Museum in Tunisia. Notice the similarities in style and I am sure there is at least one more example. Given the amount of work involved in cutting marble into sheets I do think this is a possible explanation for the effect seen here. What do you think?

Experimenting with fused glass

Cutting a block of fused glass using a hammer and hardie

I was asked to run an experiment recently in collaboration with Sue Heaser, an archaeologist with a special interest in Roman glass beadwork. She had seen my work using the hammer and hardie and wanted to know if it could have been these tools that the Romans used to cut the glass blocks into slices ready for creating the beads.

The result was variable, there were some good cuts but some pieces did not cut well enough to be used. I used a steel hammer as opposed to a carbide tipped one that we usually use for glass. This is simply because the Romans didn’t have them.

Looking back I would have sharpened both blades to ensure there was a better cut. The ancient mosaicists would have had a slave who’s job would be to keep all the tools sharp, and they would have bee very good at it!

The other possibility is that they used something like and iron wire bow saw, hopefully we will be trying that in the future too.

Lawrence

If you’d like to find out more or even make your own Roman mosaic copy then the shop is still open, just click here.

INSTAGRAM

Glass, cutting, grinding, polishing

Some years back I had some large smalti pieces so I thought I’d try running them through the electric tile saw I had at the time. I set the cut to be 4mm and this is the result. They were about 40mm x 10mm x 4mm (thick).

Smalti is formed in ‘pizza’ that are round shapes of the coloured glass shaped like, well, you guessed it pizza! You then use a glass scorer to mark and then break the pizza into smaller pieces over the hardie. Once they are small enough you then cut them using the hammer and hardie.

There is quite a bit of debris from the saw and you definately need mask and eye protection.

The piece on the left is as it comes off the saw, the white marks are from the abraisive effect on the glass, the same effect you get when you use a grinding stone on marble. As you can see it is like the pieces of old glass that you find washed up on the beach that have been rolled over on the sea bed. The piece on the right has had some wax polish.

Obviously smalti used for wall mosaics, such as the later Byzantine ones do not need to be ground down.

We do know though that they used glass in some floor mosaics for the bright greens and blues. This would have needed to be ground down the it would have had the effect you see here on the left. As with the marble the colours would have come back up with polishing with wax.

Hand cut tesserae or machine cut?

One major problem we have to overcome now when making copies of Roman mosaics is getting tesserae that are not all machine cut.

Unless you have a hammer and hardie and have the time to cut from large tiles the chances are you will have to get in machine cut tesserae.

There are two problems with this:

1. The mosaic will look very ‘flat’, very one dimensional, a look I refer to as ‘industrial mosaic’.

2. If you are following a pattern, or even using a staff, you will find that you have to be very accurate with your dimensions. With your tesserae all exactly the same size you are not able to use thinner or wider tesserae as lines wander.

A way to get tesserae so they look all hand cut

Get in a size that you can cut into four, don’t be too precise with your cutting and you should end up with four tesserae that are all slightly irregular.

This then would getting 20mm or 10mm tesserae and cutting them into four. The 10mm option would obviously mean you have 5mm tesserae so be ready to work slowly!


Roman mosaic shop

Cutting marble that won’t!

Cutting marble that doesn’t cut. Whether you are using nippers or a hammer and hardie, if the piece of stone you are attempting to cut is not cutting then move the stone further out from under the blades.

Look at the drawing here, it is a front on drawing of a hammer over a piece of marble on the hardie. As you can see the hammer blade does not cover all of the marble piece. Remember, although we talk about cutting we do not cut stone, we are in fact sending a fracture through it.

By moving the blades further off the stone we are focusing the energy from the strike of the blade to a smaller area. This then means more power goes to a smaller area. The arrow shows the direction the hammer needs to move.

Always use tools as if you were just going to be using them every day for the next 10 years. Use the safest, most effective, most economical of your energy techniques that you can.

Roman mosaic shop

Setting a geometric mosaic freehand

Setting a Roman geometric mosaic without drawing out a pattern. It is not a difficult as it sounds!

I have run numerous workshops taking complete beginners through this process and they have all been able to do it.

One thing you don’t need to do is to learn the underlying geometry. You need to understand the pattern, this is different from the geometry.

The next step is to see the main points of the patterns, things such as crossover points in strand mosaics, centrepoints and centre tesserae.

Knowing these things gives you the parts of the mosaic that you need to set first. Once you have these the rest of the mosaic pattern will fall into place.

Below you can see a student working on their mosaic. The baseboard is the right outer dimensions then a layer of cement has been put on the board. Using a marked staff set up for this particular pattern she is pushing the tesserae into the cement.

This pattern is a ‘Solomons knot with interwoven Square’.

Roman mosaic shop

Setting Geometric Patterns

Getting a good photo of a geometric pattern in a Roman mosaic is essential. You need to be able to work out the underlying geometry to understand how the pattern is put together.

What you must also realise is that quite a few of the patterns that have been set in the mosaic itself do not follow the ‘correct’ geometry. If they worked following etched lines on the nucleus or sinopia (painted lines) on the layer of wet cement then how is this explained?

It is possible to set most, if not all patterns using using a short thin length of wood called a staff. This is marked with the dimensions of that particular pattern add in string lines and longer batons and you have all you need.

Working with a staff does mean that you can still be very accurate so the discrepancies does confirm to me that, for some at least they worked completely freehand just using the staff as a general guide.

In this photo here you can see how the superimposed lines show the way the pattern repeats itself and how close to the underlying geometry this mosaic is.

If you’d like to learn how to draw out these patterns to do a mosaic with or just for your own interest then click on the link below.

Shop Roman Mosaics

What tools did they use?

Roman geometry/building tools currently in the British Museum. We don’t have any tools that we can say are specifically used for Roman mosaic work so it is a case of just looking at what has been found and seeing what could have been used in that work.

What you must be wary of is assuming something was used just because it fits our theory. You need to use it in your own work…..a lot! Then the chances are you will find that you can actually do without it.

We do not have anywhere near the same experience the Romans did working direct onto the floor, laying many, many mosaics. So you always need try and use what information we have to gain the best experience.

This is why I get students on my workshops and through my online training to work in such as way that purposely develops your eye in a very structured way. You can then estimate distance, lines etc without measuring everything and then get an insight into the way of working that someone would have used after years of this.

If you’d like to learn more then there are a number of things in the shop that will help you.

Roman mosaic shop

Marking your cuts, does it make sense?

Does marking your material make for better cuts?
It might at the beginning but it doesn’t do you any favours at all.

This is something I see from time to time where people draw lines on the marble or smalti to guide them where to cut. By doing this you do not help your eye to develop to be able to cut without lines to follow. Drawing on the material also just adds more time to the process.

So be confident enough to make the mistakes in your cuts so you give yourself the chance to develop your eye which saves you so much more time and material later on. Do what seems hard now to make it easier for you later on.

Another thing you need to consider is how many cuts you make on an individual tesserae where you need it to fill a gap that does not fall into the square /triangle / keystone type. If you haven’t got the shape you need after four cuts, throw that tesserae away and start again. This is because you can end up cutting and cutting and just end up with some fragment that is no use.

Cut to the approximate shape then just whack it in! 😁
Shop Roman Mosaics

What’s the pattern?

Deciphering a Roman geometric mosaic pattern can sometimes leave you with a number of choices. The pattern is distinct from the geometry, You can have the geometry of the mosaic worked out but still not be completely sure about the pattern.

Look at the two drawings. On the right you can see by the way that I have coloured in the mosaic that it is made up of eight interwoven heart shapes which also create two interwoven squares.

On the left, by following the green arrows you can see that this pattern can also be just one continuous strand. Unless the original has distinct strand colours, as in the example on the right, then you just have to take a guess.

Roman mosaic shop